<< Lesson 14Lesson 16 >>
Welcome to my number fifteen in my series of WebGL tutorials! In it,
we’ll take a look specular maps, which give your scenes greater realism
by making it easy to specify how reflective an object is at every point
on its surface, just as normal textures allow you to specify its
detailed colour. In terms of new code, this is actually a pretty simple
extension on top of what we’ve already covered, but conceptually it’s a
bit of a jump.
Here’s what the lesson looks like when run on a browser that supports WebGL:
Click here and you’ll see the live WebGL version, if you’ve got a browser that supports it; here’s how to get one if you don’t. You’ll see a spinning model of the Earth, with a very bright specular glint — the reflection of the Sun from its surface. More importantly, if you look closely, you’ll see that the specular glint only appears on the oceans; the land, as you’d expect, doesn’t reflect the light in a specular fashion.
Try switching off the “Use specular map” toggle underneath the canvas. You’ll see that now the specular highlight appears on the land too; you might also feel (as I did) that this rather ruins the illusion, and makes the specular glint look more like a very bright spotlight being shone at the Earth. Specular maps can really improve realism by giving you fine-grained control over the way objects in your model interact with the lighting.
Next, switch the “Use specular map” back on, reduce the diffuse light’s intensity to, say, (0.5, 0.5, 0.5), and then switch off the “Use color map” toggle. You’ll see that the colour texture of the earth is lost, but the specular highlight is still affected by whether or not it would be over land or sea.
So, how does it work? Read on to find out.
Before we wade into the code, the usual warning: these lessons are targeted at people with a reasonable amount of programming knowledge, but no real experience in 3D graphics; the aim is to get you up and running, with a good understanding of what’s going on, so that you can start producing your own 3D Web pages as quickly as possible. If you haven’t read the previous tutorials already, you should probably do so before reading this one — here I will only explain the new stuff. The lesson is based on lesson 14, so you should make sure that you understand that one.
There may be bugs and misconceptions in this tutorial. If you spot anything wrong, let me know in the comments and I’ll correct it ASAP.
There are two ways you can get the code for this example; just “View Source” while you’re looking at the live version, or if you use GitHub, you can clone it (and the other lessons) from the repository there.
Before we take a look at the code, it’s probably worth explaining the background. So far, we’ve been treating textures as a nice easy way of “skinning” our 3D objects with images. We specify an image, and our object has per-vertex coordinates to say which part of the image should go where, so when we draw each pixel in the object in our fragment shader, we can work out the portion of the image that corresponds to that part of the object, take its colour from the sampler object that represents the texture in the shader, and use that as the colour of the object at that point.
Specular maps take this logic one step further. The colour of a point in the texture is, of course, specified by red, green, blue, and alpha components. In the shader, each of these is a floating point number. But there’s no particular reason why we have to use them as colour values. You will remember from the last lesson that the shininess of a material is determined by a single floating point number. There’s no reason why we shouldn’t use textures as a way of passing a “shininess map” up to the fragment shader, just as we normally use it to pass a colour map.
So that’s the trick we use in this example. Two separate textures are passed up to the fragment shader to use on the Earth; a colour map that looks like this:
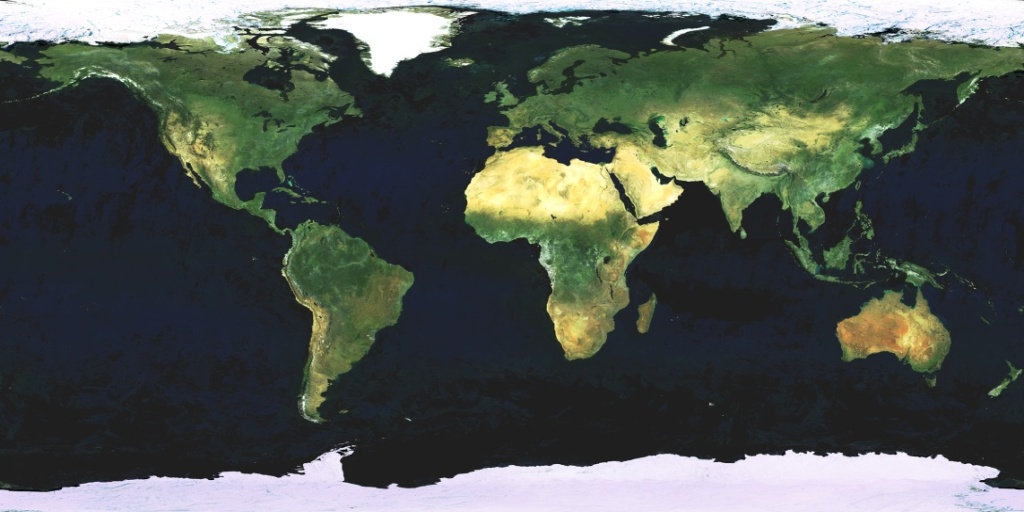
…and a lower-resolution specular map, which looks like this:
This is just a regular GIF file, which I created in Paint.NET using the colour map as a starting point. I decided to set the red, green and blue components of the colour at each point to the same value: the shininess of the point. I also needed to choose a value that would mean “this bit of the Earth is not shiny”; because most of the image was pretty dark (a shininess of 32 leads to the RGB colour of 32, 32, 32, which is a very dark grey) I decide to use pure white for that.
So, with all that explained, let’s go to the code. The differences between the code for this lesson and lesson 14’s are actually quite minimal, and pretty clear. As you might expect, the really important stuff is in the fragment shader, so let’s take a look at that (with changed stuff highlighted in red, as usual).
The first change is that we have a couple of new uniforms specifying whether or not we want to use the colour and specular maps:
  #ifdef GL_ES
  precision highp float;
  #endif

  varying vec2 vTextureCoord;
  varying vec4 vTransformedNormal;
  varying vec4 vPosition;

  uniform bool uUseColorMap;
  uniform bool uUseSpecularMap;
  uniform bool uUseLighting;
Next, we have uniform samplers for the two textures. We’ve renamed the old uSampler, which was used for the colour texture, to uColorMapSampler, and added a new one for the sampler that represents the specular map.
  uniform vec3 uAmbientColor;

  uniform vec3 uPointLightingLocation;
  uniform vec3 uPointLightingSpecularColor;
  uniform vec3 uPointLightingDiffuseColor;

  uniform sampler2D uColorMapSampler;
  uniform sampler2D uSpecularMapSampler;
Next comes our normal boilerplate code to handle the case where the user wants to switch off lighting effects, and to calculate the normal and the light direction if they don’t:
  void main(void) {
    vec3 lightWeighting;
    if (!uUseLighting) {
      lightWeighting = vec3(1.0, 1.0, 1.0);
    } else {
      vec3 lightDirection = normalize(uPointLightingLocation - vPosition.xyz);
      vec3 normal = normalize(vTransformedNormal.xyz);
And finally we get the code that actually handles the specular map. Firstly, we define a variable that will hold the amount of specular lighting we’re going to apply; this will, of course, be zero if the fragment we’re considering turns out to have no specular lighting after we’ve done all the calculations.
float specularLightWeighting = 0.0;
Next, we want to work out the shininess for this bit of the material. If the user has specified that we shouldn’t use the specular map, this code makes the (essentially arbitrary) choice of using 32.0. Otherwise, we get the value from the specular map’s value for the fragment’s texture coordinates, just as we would previously have found the colour maps’ value. Now, our specular map actually has the shininess value stored in all three components of the colour at each image — red, green and blue are all the same, which is why it appears as greyscale when viewed as an image. We use the red one in this code, though we could have used either of the others if we’d wanted to:
      float shininess = 32.0;
      if (uUseSpecularMap) {
        shininess = texture2D(uSpecularMapSampler, vec2(vTextureCoord.s, vTextureCoord.t)).r * 255.0;
      }
Now, you’ll remember that we needed some way of saying “this bit of the material is not shiny” in the specular map, and that I chose to use white, as that had good contrast against the dark-grey areas for the shinier parts of the Earth. So we don’t do any calculations for specular lighting if the value for the shininess as extracted from the map is greater than or equal to 255.
if (shininess < 255.0) {
The next bit of code is just the same specular highlight calculation we had in the last lesson, except that we use the shininess constant that we extracted from the map:
        vec3 eyeDirection = normalize(-vPosition.xyz);
        vec3 reflectionDirection = reflect(-lightDirection, normal);

        specularLightWeighting = pow(max(dot(reflectionDirection, eyeDirection), 0.0), shininess);
      }
And finally, we add all of the different forms of lighting’s
contributions together, and use that to weight the colour of the
fragment, whether it’s from the colour map or, if uUseColorMap is false, just a constant white.
      float diffuseLightWeighting = max(dot(normal, lightDirection), 0.0);
      lightWeighting = uAmbientColor
        + uPointLightingSpecularColor * specularLightWeighting
        + uPointLightingDiffuseColor * diffuseLightWeighting;
    }

    vec4 fragmentColor;
    if (uUseColorMap) {
      fragmentColor = texture2D(uColorMapSampler, vec2(vTextureCoord.s, vTextureCoord.t));
    } else {
      fragmentColor = vec4(1.0, 1.0, 1.0, 1.0);
    }
    gl_FragColor = vec4(fragmentColor.rgb * lightWeighting, fragmentColor.a);
  }
If you’ve got this far, you actually understand everything there is
to know about the code for this lesson. There are other changes, but
none are worth a detailed code walkthrough. initShaders has new code to deal with the new uniforms, initTextures needs to load the two new textures, the code that loaded up the teapot is replaced by an initBuffers function just like the one from lesson 11, drawScene
has code to draw a sphere rather than a teapot, and to take the values
in the user-input fields below the canvas and put them into the
appropriate uniforms, and animate has been updated to make the earth spin.
And after that, that’s it! You now know how to use a texture to provide information about an object’s specular shininess. As you’ve no doubt worked out by this point, there’s nothing to stop you from using textures to pass up other fine-grained information to your shaders — people often use similar techniques to this for giving detailed maps of the variations in the surface normals, which allows you to have subtly bumpy surfaces without having to create lots of vertices. We’ll take a closer look at that in a future lesson.
Acknowledgments: the Earth texture is courtesy of the European Space Agency/Envisat. Thanks also to Paul Brunt for his suggestion to increase the specular lighting levels to make the demo page for this lesson clearer.


Very nice effect :)
Thanks!
hi giles! first very compliments for your tutorials, they are very useful and I appreciate them a lot!
maybe I have found a little bug in the vertex shader code (online repository). there is a gl_Position variable and it’s not declared. :)
that’s all.
now…i’m waiting for a normal mapping tutorial… ;)
thanks a lot!
ehm..sorry giles, i’ve realized that gl_Position is a special variable in GLSL language just like gl_FragColor.
@jojo — yup, that’s right. Glad you worked it out! I’ll definitely get normal mapping done sometime — it’s scaring me a bit, though ;-)
Hello guys,
maybe this isn’t right place for this question :)
I have problem to read depth buffer. I used this tutorial, and previous also, to create some 3d terrain. I add event click on canvas element which should back 3d coordinates depends when i click on terrain. It isn’t problem to read x and y windows coordinated, but I have NO idea how to find z coordinates. OpenGl contain readPixel which can return z coordinate depends on x and y. Some function exist in OpenGL es but it can read just color buffer.
Anyone can help?
thx in advance,
Milos
@Milos — I don’t think there’s any way around that with the current version of WebGL — people doing shadow-mapping (which also relies on being able to get the Z value from a framebuffer) have had to implement it by rendering the Z value into the colour buffer, which is a horrible hack…
hi giles:
Lesson is end?
I’ve found Lesson 16 in repository, why?
Hi hider — no, I’ve plenty of plans for more and just haven’t had the time to write them! Lesson 16 is pretty much ready to write up — I can’t say when I’ll be able to do it, though.