<< Lesson 1Lesson 3 >>
Welcome to my second WebGL tutorial! This time around we’re going to
take a look at how to get colour into the scene. It’s based on number 3 in the NeHe OpenGL tutorials.
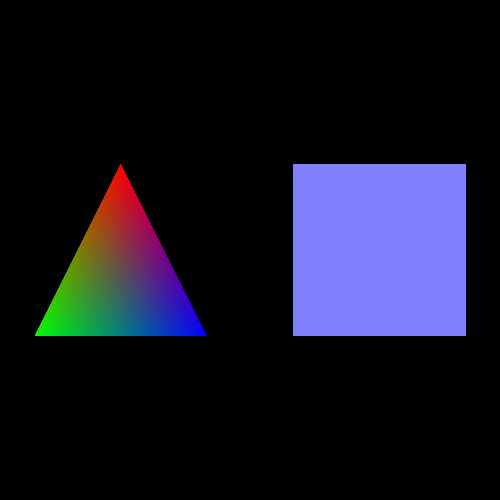
Here’s what the lesson looks like when run on a browser that supports WebGL:
Click here and you’ll see the live WebGL version, if you’ve got a browser that supports it; here’s how to get one if you don’t.
More on how it all works below…
A quick warning: these lessons are targeted at people with a reasonable amount of programming knowledge, but no real experience in 3D graphics; the aim is to get you up and running, with a good understanding of what’s going on in the code, so that you can start producing your own 3D Web pages as quickly as possible. If you haven’t read the first tutorial already, you should do so before reading this one — here I will only explain the differences between the code for that one and the new code.
As before, there may be bugs and misconceptions in this tutorial. If you spot anything wrong, let me know in the comments and I’ll correct it ASAP.
There are two ways you can get the code for this example; just “View Source” while you’re looking at the live version, or if you use GitHub, you can clone it (and the other lessons) from the repository there. Either way, once you have the code, load it up in your favourite text editor and take a look.
Most of it should look pretty similar from the first tutorial. Running through from top to bottom, we:
- Define vertex and fragment shaders, using HTML
<script>tags with types"x-shader/x-vertex"and"x-shader/x-fragment" - Initialise a WebGL context in
initGL - Load the shaders into a WebGL program object using
getShaderandinitShaders. - Define the model-view matrix
mvMatrixalong with utility functions calledloadIdentity,multMatrix,mvTranslatefor manipulating it. - Define the projection matrix
pMatrix, and aperspectiveutility function for manipulating it. - Define
setMatrixUniformsfor pushing the model-view and projection matrices over the JavaScript/WebGL divide so that the shaders can see them. - Load up buffers containing information about the objects in the scene using
initBuffers - Draw the scene itself, in the appropriately-named
drawScene. - Define a function
webGLStartto set everything up in the first place - Finally, we provide the minimal HTML required to display it all.
The only things that have changed in this code from the first lesson are the shaders, initBuffers, and the drawScene
function. In order to explain how the changes work, you need to know a
little about the WebGL rendering pipeline. Here’s a diagram:
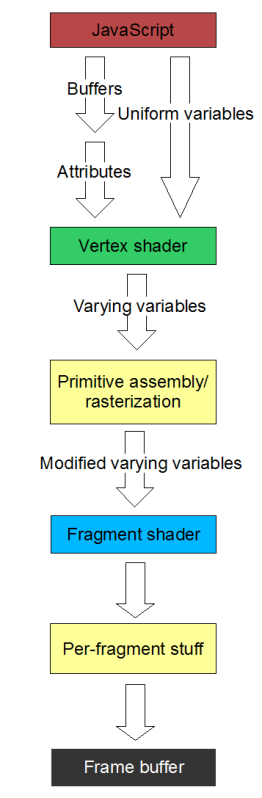 The diagram shows, in a very simplified form, how the data passed to JavaScript functions in
 drawScene is turned into pixels displayed in the WebGL canvas on the screen. It only shows the steps needed to explain this lesson; we’ll look at more detailed versions in future lessons.
At the highest level, the process works like this: each time you call a function like drawArrays,
WebGL processes the data that you have previously given it in the form
of attributes (like the buffers we used for vertices in lesson 1) and
uniform variables (which we used for the projection and the model-view
matrices), and passes it along to the vertex shader.
It does this by calling the vertex shader once for each vertex, each
time with the attributes set up appropriately for the vertex; the
uniform variables are also passed in, but as their name suggests, they
don’t change from call to call. The vertex shader does stuff with this
data — in lesson 1, it applied the projection and model-view matrices so
that the vertices would all be in perspective and moved around
according to our current model-view state — and puts its results into
things called varying variables. It can output a number of varying variables; one particular one is obligatory, gl_Position, which contains the coordinates of the vertex once the shader has finished messing around with it.
Once the vertex shader is done, WebGL does the magic required to turn
the 3D image from these varying variables into a 2D image, and then it
calls the fragment shader once for each pixel in the image. (In some 3D
graphics systems you’ll hear fragment shaders referred to as pixel
shaders for that reason.) Of course, this means that it’s calling the
fragment shader for those pixels that don’t have vertices in them — that
is, the ones in between the pixels on which the vertices wind up. For
these, it fills in points into the positions between the vertices via a
process called linear interpolation — for the vertex positions that make
up our triangle, this process “fills in” the space delimited by the
vertices with points to make a visible triangle. The purpose of the
fragment shader is to return the colour for each of these interpolated
points, and it does this in a varying variable called gl_FragColor.
Once the fragment shader is done, its results are messed around with a little more by WebGL (again, we’ll get into that in a future lesson) and they are put into the frame buffer, which is ultimately what is displayed on the screen.
Hopefully, by now it’s clear that the most important trick that this lesson teaches is how to get the colour for the vertices from the JavaScript code all the way over to the fragment shader, when we don’t have direct access from one to the other.
The way we do this is to make use of the fact that we can pass a number of varying variables out of the vertex shader, not just the position, and can then retrieve them in the fragment shader. So, we pass the colour to the vertex shader, which can then put it straight into a varying variable which the fragment shader will pick up.
Conveniently, this gives us gradients of colours for free. All varying variables set by the vertex shader are linearly interpolated when generating the fragments between vertices, not just the positions. Linear interpolation of the colour between the vertices gives us smooth gradients, like those you can see in the triangle in the image above.
Let’s look at the code; we’ll work through the changes from lesson 1. Firstly, the vertex shader. It has changed quite a lot, so here’s the new code:
  attribute vec3 aVertexPosition;
  attribute vec4 aVertexColor;

  uniform mat4 uMVMatrix;
  uniform mat4 uPMatrix;

  varying vec4 vColor;

  void main(void) {
    gl_Position = uPMatrix * uMVMatrix * vec4(aVertexPosition, 1.0);
    vColor = aVertexColor;
  }
What this is saying is that we have two attributes — inputs that vary from vertex to vertex — called aVertexPosition and aVertexColor, two non-varying uniforms called uMVMatrix and uPMatrix, and one output in the form of a varying variable called vColor.
In the body of the shader, we calculate the gl_Position
(which is implicitly defined as a varying variable for every vertex
shader) in exactly the same way as we did in lesson 1, and all we do
with the colour is pass it straight through from the input attribute to
the output varying variable.
Once this has been executed for each vertex, the interpolation is done to generate the fragments, and these are passed on to the fragment shader:
  #ifdef GL_ES
  precision highp float;
  #endif

  varying vec4 vColor;

  void main(void) {
    gl_FragColor = vColor;
  }
Here, after the floating-point precision boilerplate, we take the input varying variable vColor
containing the smoothly blended colour that has come out of the linear
interpolation, and just return it immediately as the colour for this
fragment — that is, for this pixel.
That’s all of the differences in the shaders between this lesson and
the last. There are two other changes. The first is very small; in initShaders we are now getting references to two attributes rather than one; the extra lines are highlighted in red below:
  var shaderProgram;
  function initShaders() {
    var fragmentShader = getShader(gl, "shader-fs");
    var vertexShader = getShader(gl, "shader-vs");

    shaderProgram = gl.createProgram();
    gl.attachShader(shaderProgram, vertexShader);
    gl.attachShader(shaderProgram, fragmentShader);
    gl.linkProgram(shaderProgram);

    if (!gl.getProgramParameter(shaderProgram, gl.LINK_STATUS)) {
      alert("Could not initialise shaders");
    }

    gl.useProgram(shaderProgram);

    shaderProgram.vertexPositionAttribute = gl.getAttribLocation(shaderProgram, "aVertexPosition");
    gl.enableVertexAttribArray(shaderProgram.vertexPositionAttribute);

    shaderProgram.vertexColorAttribute = gl.getAttribLocation(shaderProgram, "aVertexColor");
    gl.enableVertexAttribArray(shaderProgram.vertexColorAttribute);

    shaderProgram.pMatrixUniform = gl.getUniformLocation(shaderProgram, "uPMatrix");
    shaderProgram.mvMatrixUniform = gl.getUniformLocation(shaderProgram, "uMVMatrix");
  }
This code to get the attribute locations, which we glossed over to a certain degree in the first lesson, should now be pretty clear: they are how we get a reference to the attributes that we want to pass to the vertex shader for each vertex. In lesson 1, we just got the vertex position attribute. Now, obviously enough, we get the colour attribute as well.
The remainder of the changes in this lesson are in initBuffers, which now needs to set up buffers for both the vertex positions and the vertex colours, and in drawScene, which needs to pass both of these up to WebGL.
Looking at initBuffers first, we define new global variables to hold the colour buffers for the triangle and the square:
  var triangleVertexPositionBuffer;
  var triangleVertexColorBuffer;
  var squareVertexPositionBuffer;
  var squareVertexColorBuffer;
Then, just after we’ve created the triangle’s vertex position buffer, we specify its vertex colours:
  function initBuffers() {
    triangleVertexPositionBuffer = gl.createBuffer();
    gl.bindBuffer(gl.ARRAY_BUFFER, triangleVertexPositionBuffer);
    var vertices = [
         0.0,  1.0,  0.0,
        -1.0, -1.0,  0.0,
         1.0, -1.0,  0.0
    ];
    gl.bufferData(gl.ARRAY_BUFFER, new Float32Array(vertices), gl.STATIC_DRAW);
    triangleVertexPositionBuffer.itemSize = 3;
    triangleVertexPositionBuffer.numItems = 3;

    triangleVertexColorBuffer = gl.createBuffer();
    gl.bindBuffer(gl.ARRAY_BUFFER, triangleVertexColorBuffer);
    var colors = [
        1.0, 0.0, 0.0, 1.0,
        0.0, 1.0, 0.0, 1.0,
        0.0, 0.0, 1.0, 1.0,
    ];
    gl.bufferData(gl.ARRAY_BUFFER, new Float32Array(colors), gl.STATIC_DRAW);
    triangleVertexColorBuffer.itemSize = 4;
    triangleVertexColorBuffer.numItems = 3;
So, the values we provide for the the colours are in an list, one set
of values for each vertex, just like the positions. However, there is
one interesting difference between the two array buffers: while the
vertices’ positions are specified as three numbers each, for X, Y and Z
coordinates, their colours are specified as four elements each — red,
green, blue and alpha. Alpha, if you’re not familiar with it, is a
measure of opaqueness (0 is transparent, 1 totally opaque) and will be
useful in later lessons. This change in the number of elements per item
in the buffer necessitates a change to the itemSize that we associate with it.
Next, we do the the equivalent code for the square; this time, we’re using the same colour for every vertex, so we generate the values for the buffer using a loop:
    squareVertexPositionBuffer = gl.createBuffer();
    gl.bindBuffer(gl.ARRAY_BUFFER, squareVertexPositionBuffer);
    vertices = [
         1.0,  1.0,  0.0,
        -1.0,  1.0,  0.0,
         1.0, -1.0,  0.0,
        -1.0, -1.0,  0.0
    ];
    gl.bufferData(gl.ARRAY_BUFFER, new Float32Array(vertices), gl.STATIC_DRAW);
    squareVertexPositionBuffer.itemSize = 3;
    squareVertexPositionBuffer.numItems = 4;

    squareVertexColorBuffer = gl.createBuffer();
    gl.bindBuffer(gl.ARRAY_BUFFER, squareVertexColorBuffer);
    colors = []
    for (var i=0; i < 4; i++) {
      colors = colors.concat([0.5, 0.5, 1.0, 1.0]);
    }
    gl.bufferData(gl.ARRAY_BUFFER, new Float32Array(colors), gl.STATIC_DRAW);
    squareVertexColorBuffer.itemSize = 4;
    squareVertexColorBuffer.numItems = 4;
Now we have all of the data for our objects in a set of four buffers, so the next change is to make drawScene use the new data. The new code is in red again, and should be easy to understand:
  function drawScene() {
    gl.viewport(0, 0, gl.viewportWidth, gl.viewportHeight);
    gl.clear(gl.COLOR_BUFFER_BIT | gl.DEPTH_BUFFER_BIT);

    perspective(45, gl.viewportWidth / gl.viewportHeight, 0.1, 100.0);
    loadIdentity();

    mvTranslate([-1.5, 0.0, -7.0])

    gl.bindBuffer(gl.ARRAY_BUFFER, triangleVertexPositionBuffer);
    gl.vertexAttribPointer(shaderProgram.vertexPositionAttribute, triangleVertexPositionBuffer.itemSize, gl.FLOAT, false, 0, 0);

    gl.bindBuffer(gl.ARRAY_BUFFER, triangleVertexColorBuffer);
    gl.vertexAttribPointer(shaderProgram.vertexColorAttribute, triangleVertexColorBuffer.itemSize, gl.FLOAT, false, 0, 0);

    setMatrixUniforms();
    gl.drawArrays(gl.TRIANGLES, 0, triangleVertexPositionBuffer.numItems);

    mvTranslate([3.0, 0.0, 0.0])
    gl.bindBuffer(gl.ARRAY_BUFFER, squareVertexPositionBuffer);
    gl.vertexAttribPointer(shaderProgram.vertexPositionAttribute, squareVertexPositionBuffer.itemSize, gl.FLOAT, false, 0, 0);

    gl.bindBuffer(gl.ARRAY_BUFFER, squareVertexColorBuffer);
    gl.vertexAttribPointer(shaderProgram.vertexColorAttribute, squareVertexColorBuffer.itemSize, gl.FLOAT, false, 0, 0);

    setMatrixUniforms();
    gl.drawArrays(gl.TRIANGLE_STRIP, 0, squareVertexPositionBuffer.numItems);
  }
And the next change… hang on, there is no next change! That was all that was necessary to add colour to our WebGL scene, and hopefully you are now also comfortable with the basics of shaders and how data is passed between them.
That’s it for this lesson — hopefully it was easier going than the first! If you have any questions, comments, or corrections, please do leave a comment below.
Next time, we’ll add code to animate the scene by rotating the triangle and the square.
Acknowledgments: working out exactly what was going on in the rendering pipeline was made much easier by reference to the OpenGL ES 2.0 Programming Guide, which Jim Pick recommended on his WebGL blog. As ever, I’m deeply in debt to NeHe for his OpenGL tutorial for the script for this lesson.


Hi giles, I am new to WebGL development and find your site very useful. Keep up the good work.
for (var i in vertices)
{
colors = colors.concat([0.5, 0.5, 1.0, 1.0]);
}
As vertices contains 16 elements, this will make colors a matrix of 48 elements. You probably don’t wanna do that. Do you ?
ed — good catch, you’re right — that’s a mistake. Must have been thinking of vertices as a list of lists… I’ll update the tutorial tomorrow so that the loop just counts to 4.
OK, fixed that. Thanks again!
You’re welcome. Your site is very useful.
Hi, thank You ! I didn`t knew that WebGL exists until i came to your page about the depth buffer.
I`m using current stable firefox (3.5.5) with Canvas3D v.0.4.3 to enable webGL. I`m curious why I can`t run the live version of this lesson, even though I run the modelviewer there http://people.mozilla.com/~vladimir/canvas3d/examples/modelview/ModelView.html w success.
Hi Gele,
Canvas3D is a precursor to WebGL; it’s not quite the same and there are differences in the APIs. It’s possible that Vlad wrote his Spore viewer in such a way that it can work with both Canvas3D and WebGL, but the stuff on this site is WebGL-only.
You may want to take a look at installing a WebGL-compatible browser, like Minefield (the pre-alpha Firefox 3.7) — it can be installed side-by-side with the current stable Firefox, so you don’t need to worry about bugs stopping you from using the ‘net normally :-)
Check out my “Lesson 0″ for details on installing Minefield, or other WebGL-compatible browsers: http://learningwebgl.com/blog/?p=11
Cheers,
Giles
You`ve read why I didn`t install Minefield between the lines :)
Thanx, it was my web reading fault – I fast skipped the second sentence ( w “alongside” word) in lesson0,[Firefox]. Now Your lessons work :) And the future web is going to be a lot more different.
Excellent, glad it worked! I definitely understand your reluctance to replace a Firefox which works perfectly well with one that might be broken, it’s very smart of the developers to make sure it works side-by-side.
Some code lines are different in this tutorial page and the real code.
Above is:
“gl.enableVertexAttribArray(vertexPositionAttribute);”
should be:
“gl.enableVertexAttribArray(shaderProgram.vertexPositionAttribute);”
and
“gl.enableVertexAttribArray(vertexColorAttribute);”
should be:
“gl.enableVertexAttribArray(shaderProgram.vertexColorAttribute);”
Thanks, Eero — I’ve fixed that.
Your site is really good.
Thanks!
Hi guys,
i liked the first lesson of this tutorial, so i tried out the second lesson, but…:
I got this error:
ERROR: 0:2:”: No precision specified for (float)
ERROR: 1 compilation errors. No code generated.
The first exampled worked fine with Minefield and OpenGL version 3.0.0 (GeForce 9800 GT/PCI/SSE2).
Any ideas what happend and how i could fix this problem?
cheers,
mtx
Hi mtx — that’s interesting! The WebGL specification does now require a floating-point precision specifier — it didn’t previously — but I was under the impression that none of the browsers required that yet. Just to clarify, do both of them now fail in Minefield? What “webgl” settings do you have set in about:config?
Hi giles,
the example of the first lesson works fine, but the example of lesson two fails with the error mentioned above.
But u gave a good hint: The settings! I just didn´t tried out to change the value of webgl.shader_validator. Set it to “false” and everything worked fine. Thanks!
Cheers,
mtx
Hi mtx — many thanks for letting me know, and sorry for the slow reply! The problem was that the WebGL specification had changed, and the shader_validator setting made Minefield insist on using the new specification. It’s meant to be off by default, but I guess yours got switched to on somehow. Anyway, this shouldn’t matter now — I’ve updated all of the tutorials to use the new spec, so they should work even with that setting switched on. Hope that helps!
Finally a proper WebGL tutorial series!
I used OpenGL a lot about ten years ago, it’s a dream come true to do this in javascript now.
Hey Andrea — great! I hope you find the tutorials useful.
This is very nitpicky but if this code is ever going to run in IE you need to get rid of the trailing commas in the colors array- but of course this is the least of IE’s problems.
Great tutorials!
Kwame — thanks! You’re quite right, I’ve been a bit lax about trailing commas. Perhaps IE will support them by the time it supports WebGL ;-) Still, I’ll try to get round to running JSLint over the lessons and sorting out thinks like that soon.
Heya,
I am a bit new to javascript, so I’m just curious as to why the need for trailing semicolons. On a few lines you have (accidentally I presume) omitted them, yet the code runs fine and there are no errors nor warnings in the javascript console. Is it just a standard or backwards compatible practice to include the trailing semicolon?
Anyway, your series is a nice read :)
Hey Andrew — glad you’re finding the tutorials readable! In JavaScript, a semicolon is required at the end of each statement a la C/C++/Java/etc, but the interpreter is required to insert them in places where it’s clear you’ve left them out. This is possibly the silliest idea in a language spec that’s not short on silly ideas… it would be much better if it required them and gave errors if they weren’t there, or it it didn’t require them (like, say, Python). But there you go.
My problem is that I code Python in my day job, so while I used to write a lot of Java, I’ve got out of the habit of using semicolons. Luckily there is a JSLint that can tell you about things like this, and I need to find time to run these tutorials through it so that I don’t pass my bad habits on to other people.
Hi giles, thanks a lot for such wonderful tutorials..!!
@Manish: You’re welcome :-)
Thanks for the good tutorials! I’ve followed the first four so far but I need help understanding some fundamental things
and hopefully you can help me out:
What I don’t follow is how the buffers for an object fit together? If I take the triangle in this tutorial as an example
you create a “triangleVertexPositionBuffer” and a “triangleVertexColorBuffer”. Ok, but what tells webGl that when
the scene is drawn a particular vertex gets a particular color? I can’t see that there is a connection between the
position buffer and the color buffer that is used for the triangle. If you understand my question, can you please
clarify this?
Thanks for help!